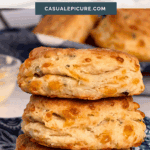
These flaky cheddar chive buttermilk biscuits are the kind of bread that makes you want to skip the entrée. I’ve been making old-fashioned buttermilk biscuits for years, but adding sharp cheddar and fresh chives takes them to a whole new level. The key is to keep everything cold and not overwork the dough, so you get those tall, tender layers that pull apart perfectly.

Want To Save This Recipe For Later?
Create a complete Southern breakfast spread by serving these savory cheddar biscuits alongside a hash brown breakfast casserole, crispy bacon, and scrambled eggs. For a quick breakfast sandwich, split one open and fill it with your favorite toppings. We can’t get enough of them stuffed with scrambled eggs and bacon. They’re also just as good at dinner next to a bowl of Texas chili or with braised chicken or grilled turkey breast.
Key Ingredients and Substitutions
With just a handful of pantry staples and some cold butter, you can make homemade biscuits with cheese from scratch that rival any bakery.
In the printable recipe below, you can find a complete list of ingredients and measurements.
- All-purpose flour: This is the base of your biscuit dough. It creates structure without making the biscuits tough. Don’t substitute bread flour, as it has too much protein and will make the biscuits dense.
- Baking powder: This is what makes the biscuits rise and gives them that light, fluffy texture. Make sure yours is fresh. Old baking powder won’t give you the lift you need. If it’s been sitting in your pantry for more than six months, grab a new container.
- Cold unsalted butter: Temperature matters here. The butter needs to be cold so it stays in distinct pieces throughout the dough. When the biscuits bake, these butter pieces create steam pockets that make the layers. Cut the butter into cubes and keep it in the fridge until you’re ready to use it.
- Sharp cheddar cheese: Sharp cheddar gives you the most flavor. Shred your own cheese from a block instead of buying pre-shredded. Pre-shredded cheese is often coated with anti-caking agents, which can prevent it from melting smoothly and may cause the cheese to leak out or burn on the baking sheet. Use shredded, not cubed, cheddar so it distributes evenly throughout the dough.
- Fresh chives: Fresh herbs make a difference here. The mild onion flavor of chives is perfect with the sharp cheddar. You can substitute green onions if you can’t find chives, but use just the green parts and chop them finely.
- Buttermilk: The acidity in buttermilk reacts with the baking powder to create extra lift, adding a subtle tang that balances the richness of the butter and cheese. Don’t have buttermilk? Mix 1 cup of regular milk with 1 tablespoon of lemon juice and let it sit for 5 minutes.
- Melted butter for brushing: This final brush of butter adds shine and extra richness to the tops of the biscuits. It’s not optional. This step makes them taste even better.

How to Make Cheddar Cheese Chive Biscuits
Here are the quick, step-by-step instructions with visuals; you can find the full instructions, including the exact ingredients, in the recipe card below.
Pro-tip: Chill the cut biscuits in the freezer for 10-15 minutes before baking. This keeps the butter cold, resulting in taller, flakier biscuits. This is one of the best tricks for making easy cheddar chive biscuits that rise properly every time.

1. In a large bowl, whisk together the flour, baking powder, and salt. Whisking helps distribute everything evenly so your biscuits rise uniformly.

2. Sprinkle the cold butter cubes over the flour mixture. Use a pastry cutter or two forks to cut the butter into the flour until it resembles coarse crumbs, with pea-sized pieces of butter still visible. Those butter pieces are what create the flaky layers.

3. Toss the shredded cheddar and chopped chives into the flour-butter mixture. Make sure they’re evenly distributed throughout.

4. Drizzle the buttermilk over the mixture and stir with a fork until everything is just moistened. The dough will look shaggy. Press it together with your hands into a loose ball. Don’t knead or overwork it. That will make tough biscuits.

5. Pat the dough into a rectangle about 8 x 6 inches.

6. Fold it like a business letter by folding one short end toward the center, then fold the other short end over it. Rotate the dough 90 degrees. Repeat the process by patting the dough into a rectangle, folding like a letter, and rotating again. This creates layers.

7. Pat the dough out one final time to about 1 inch thickness. Using a circular cutter, press straight down and lift straight up. Don’t twist the cutter. Twisting seals the edges and prevents the biscuits from rising properly.

8. Any remaining dough scraps can be gathered together and pressed out again, although keep in mind this second batch won’t be quite as tall as the first. The number of biscuits you get will depend on the size of your biscuit cutter. A 2 inch cutter yields about 10 to 12 biscuits, while a 3 inch cutter makes about 8 to 10.

9. Place the cut biscuits on a parchment-lined baking sheet with space between each one. Pop them in the freezer for 10-15 minutes. This step keeps the butter cold, allowing it to create steam in the oven, which helps the biscuits rise higher.

10. Bake at 425°F for 15 minutes or until the tops are golden brown.

11. Brush with melted butter as soon as they come out of the oven.

12. Serve warm with butter or turn them into a bacon, egg, and cheese breakfast sandwich.
Make-Ahead and Storage
Make-Ahead: You can cut the biscuits and freeze them unbaked for up to 3 months. Place them on a baking sheet and freeze until solid. Then, transfer them to a freezer bag. Bake from frozen, adding 2-3 minutes to the baking time. The dough can be made up to 1 hour ahead. Just keep it covered and refrigerated until you’re ready to cut and bake.
How to Store: Store leftover baked biscuits in an airtight container at room temperature for up to 2 days. For longer storage, freeze baked biscuits in a freezer bag for up to 3 months. They reheat well.
How to Reheat: To reheat baked biscuits and restore their flaky texture, wrap them in foil and warm them in a 350°F oven for 10 minutes. For frozen biscuits, thaw at room temperature, then reheat in the oven. Skip the microwave. It makes biscuits gummy and dense.
Recipe Tips and Notes
- Keep everything cold. Cold butter is the secret to flaky biscuits. If your kitchen is warm or your hands are hot, chill the butter in the freezer for 10 minutes before starting. You can even chill the flour and the bowl.
- Don’t overwork the dough. Mix just until the ingredients come together. The dough should look shaggy, not smooth. Overworking develops gluten, which makes biscuits tough instead of tender.
- Shred your own cheese. Pre-shredded cheese is often coated with anti-caking agents, which prevent smooth melting and can cause the cheese to leak out or burn during baking. Shredding from a block takes an extra minute but makes a real difference.
- Check the dough consistency. If the dough feels too dry and won’t come together, add buttermilk 1 tablespoon at a time. If it’s too sticky to handle, dust your work surface and hands with a little flour. The dough should be soft but not wet.
- Press, don’t twist. When cutting the biscuits, press the cutter straight down and pull it straight up. Twisting the cutter seals the edges and prevents the biscuits from rising to their full height.
- Use a sharp cutter. A sharp biscuit cutter or even a sharp-edged glass works better than a dull one. Clean cuts help the biscuits rise straight up, rather than being lopsided.
- Give them space. Leave an inch or two between biscuits on the baking sheet. This allows hot air to circulate around each biscuit so they bake evenly and develop a crisp exterior.
- Brush with butter immediately. As soon as the biscuits come out of the oven, brush them with melted butter. The hot biscuits absorb the butter, making them even more flavorful.
- The second batch won’t be as tall. If you gather and re-roll the dough scraps, those biscuits won’t rise quite as high as the first batch. The dough has been worked more, which develops gluten and reduces flakiness.

Frequently Asked Questions

More Recipes to Try
Looking for more breakfast favorites? Try these other recipes:
- Bacon Egg and Cheese Biscuit Sandwich – Split these cheddar chive biscuits and fill them with crispy bacon, a fried egg, and melted cheese. It’s the perfect breakfast sandwich.
- Hash Brown Breakfast Casserole – This hearty casserole is loaded with crispy hash browns, eggs, cheese, and sausage. It’s perfect for feeding a crowd. Serve these biscuits alongside for a complete breakfast spread.
- Mexican Breakfast Skillet – This one-pan breakfast has eggs, potatoes, peppers, and cheese.
- Migas – This Tex-Mex breakfast scramble comes with crispy tortilla strips, eggs, and cheese.
Let’s Connect! If you make this recipe or any other recipe on Casual Epicure, please don’t forget to rate the recipe and leave a comment below. It helps others who are considering making our recipes and we love hearing about your cooking experiences. And if you snapped some shots, share them on Instagram, and be sure to tag @casual.epicure so we can feature them in our stories.

Cheddar Cheese Chive Biscuits
Want To Save This Recipe For Later?
Equipment
- Medium Bowl
- Biscuit Cutter
- Cookie or Baking Sheet
Ingredients
- 2 cups ll-purpose flour
- 4½ tsp baking powder
- 1 tsp kosher salt
- ½ cup cold unsalted butter, cut into cubes
- 3 ounces sharp cheddar cheese, shredded (about 1 cup shredded)
- ¼ cup chopped fresh chives,
- 1 cup buttermilk
- 2 tbsp melted unsalted butter, for brushing
Instructions
- Preheat oven to 425°F.
- In a large bowl, whisk together the flour, baking powder, and salt until they are evenly distributed.
- Sprinkle the cold butter cubes over the flour mixture, then use a pastry cutter or two forks to break up the butter into pea-sized chunks.
- Add the shredded cheddar and chopped chives to the flour mixture and toss until evenly incorporated.
- Drizzle the buttermilk over the mixture and stir with a fork until evenly moistened. Press the dough together into a loose ball with your hands.
- Pat the dough into a rectangle approximately 8 x 6 inches. Fold the dough like a letter: fold one short end toward the center, then fold the other short end over it (like folding a business letter into thirds). Rotate the dough 90 degrees. Dust with more flour as needed if the dough feels sticky.
- Pat the dough out into a rectangle again, approximately 8 x 6 inches. Repeat the envelope fold: fold one short end to the center, then fold the other end over it. Rotate 90 degrees.
- Pat out into a rectangle approximately 1-inch thick. Using a circular cookie cutter or biscuit cutter, cut into rounds. Important: Press the cutter straight down and lift it straight up. Don’t twist, as this may ruin the lovely layers.
- Place them on a parchment-lined baking sheet, leaving an inch or two of space between each. Any remaining dough scraps can be gathered together and pressed out again, although keep in mind this second batch won’t be quite as tall as the first.
- For best results, chill the cut biscuits in the freezer for 10-15 minutes before baking to keep the butter cold and get flaky biscuits.
- Bake for 15 minutes or until tops are golden brown.
- Remove from oven and brush generously with melted butter. Serve warm.