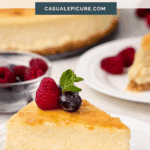
My first cheesecake came from a Philadelphia cream cheese package (the same recipe my mother made with store-bought graham cracker crusts). From those early baking days to discovering springform pans and making homemade crusts, that simple formula has led to countless variations, including this Crème Brûlée Cheesecake recipe, a silky smooth cheesecake topped with a crisp caramelized sugar that cracks perfectly with each bite.

Want To Save This Recipe For Later?
The rich, creamy filling sits on a buttery graham cracker crust, while the caramelized sugar creates that signature brittle finish that makes regular crème brûlée irresistible. My tested tips and techniques will help you nail the perfect texture every time, from achieving a silky-smooth filling to getting the ideal crack when your fork breaks through the golden sugar crust. Like our chocolate pecan pie bars and chocolate cherry brownies, this recipe transforms two classic flavors into something extraordinary.
Key Ingredients and Substitutions
The ingredients for this Crème Brûlée Cheesecake are straightforward and focus on quality basics that create the perfect texture and flavor.
In the printable recipe below, you can find a complete list of ingredients and measurements.

- Cream Cheese: Use full-fat cream cheese in block form, not whipped or in tubs. The blocks should be at room temperature for a smooth, lump-free batter. Four 8-ounce packages give us the ideal cheesecake texture for a 9-inch springform pan.
- Eggs: Room-temperature eggs blend better with the cream cheese, creating a silkier texture. Cold eggs can cause lumps in your batter, so set them out with your cream cheese.
- Sour Cream: Full-fat sour cream adds richness and a subtle tang that balances the sweetness. Greek yogurt can work as a substitute, but the texture won’t be as creamy.
- Vanilla Extract: Pure vanilla extract gives the cheesecake that classic flavor. You can substitute vanilla bean paste or the seeds from one vanilla bean pod for a more pronounced vanilla flavor and those beautiful specks throughout the filling.
- Graham Crackers: The foundation of our crust. You can substitute vanilla wafers or gingersnaps – just maintain the same amount of crumbs. Ready-made graham cracker crumbs work perfectly. We made our graham cracker crumbs by pulverizing graham crackers in a food processor. For 1 ½ cups of graham cracker crumbs, you will need 13-14 whole graham crackers.
- Sugar: Regular granulated sugar works for the filling, but superfine sugar melts more evenly for the brûlée topping. Make your own by pulsing granulated sugar in a food processor for about 30 seconds.
How to Make Crème Brûlée Cheesecake
Here are the quick, step-by-step instructions with visuals; you can find the full instructions, including the exact ingredients, in the recipe card below.
Pro tip: Set out your cream cheese, eggs, and sour cream at least 2 hours before starting. Room-temperature ingredients blend smoothly, preventing lumps in your batter that can mar the silky texture of your finished cheesecake.
1. Prep the Pan: Position an oven rack in the center of the oven and preheat it to 325℉. Wrap a 9-inch springform pan with three separate layers of heavy-duty aluminum foil, ensuring each layer completely covers the previous one and extends up the sides. This will help prevent water from seeping in during baking. Each layer should be separate, which is crucial for keeping your crust from getting soggy.
2. Make the Crust: Combine graham cracker crumbs with sugar, then mix in the melted butter until well combined. Pour the mixture into your prepared springform pan and press firmly into the bottom and up the sides. Use a one-cup measuring cup to help pack the crumbs firmly and evenly. A well-packed crust ensures clean, beautiful slices.


3. Create the Filling: Using your stand mixer (or hand mixer), blend the cream cheese, sour cream, vanilla extract, and salt until smooth and creamy. This is the time to mix thoroughly – you can’t overwork these ingredients. Occasionally, pause to scrape the sides and bottom of the bowl with a spatula to ensure all ingredients are evenly incorporated. Once smooth, add the eggs one at a time on low speed, mixing just until each egg is incorporated. Adding eggs last and mixing only until combined at this stage is crucial for a perfect texture.


4. Add the Filling: Pour the cheesecake batter into your prepared springform pan once all eggs are incorporated and the ingredients are well combined. Place the foil-wrapped springform pan into a large roasting pan.
5. Prepare for Baking: Place the roasting pan on the center oven rack and then carefully pour hot water into the roasting pan until it reaches halfway up the sides of the springform pan (about 1 to 1½ inches of water). This water bath helps your cheesecake bake evenly.


6. Bake the Cheesecake: Bake for approximately 65-75 minutes. The cheesecake is done when the outer 2-3 inches appear set when the pan is shaken gently and slightly raised, while the center 3-4 inches has a controlled wobble. Once baking is complete, turn off the oven and crack the door open about 1 inch. Let the cheesecake stay in the oven with the water bath for 1 hour.
7. Cool and Set: Carefully remove the roasting pan from the oven after an hour. Take the springform pan out of the water bath, remove the foil, and place it on a cooling rack. Run a knife or offset spatula around the edge to loosen the cheesecake from the pan, but keep the springform ring in place. Let it cool at room temperature for 2 hours, then cover and refrigerate for at least 4 hours or overnight.

8. Create the Brûlée Top: Once fully chilled, remove the springform ring and gently pat the surface with a paper towel to remove condensation. Dust about 1½-2 tablespoons superfine sugar evenly over the entire surface using a fine-mesh strainer. Hold your culinary torch at a 45-degree angle, about 2-3 inches from the surface, and use slow, sweeping motions to melt the sugar until light amber. Let this first layer harden for 1 minute, then add a second layer of sugar (about one tablespoon) and gently torch again. Let the topping cool and harden completely for 2-3 minutes.


9. Serve: Refrigerate for 15-20 minutes to ensure the cheesecake is well set. For clean cuts, dip a sharp knife in hot water, dry completely, then slice. Wipe the knife clean between each slice. Top with fresh berries and serve. Store leftover cheesecake covered in the refrigerator for up to 5 days.


Make-Ahead and Storage
Make-Ahead: The cheesecake needs at least 6 hours of chilling time, so it’s perfect for making a day ahead. For best results, wait to add the brûléed sugar topping until just before serving – this ensures you get that perfect crack when breaking through the caramelized surface.
How to Store: Cover and refrigerate leftover cheesecake for up to 5 days. To freeze, place the cheesecake (either whole or cut into slices) on a freezer-safe plate or leave it on the springform pan bottom. Place in the freezer for several hours until firm. Once firm, wrap the cheesecake or individual slices tightly in plastic wrap, then in heavy-duty aluminum foil. Place wrapped cheesecake or slices in an airtight container or freezer bag. Frozen cheesecake maintains quality for up to 2 months.
How to Thaw: Place the wrapped cheesecake in the refrigerator overnight to thaw. Individual slices will thaw in several hours, while a whole cheesecake needs 8-12 hours. Keep the cheesecake wrapped while thawing to prevent condensation from forming on its surface. Once thawed, add the brûléed topping just before serving.
Recipe Tips and Notes
- Add water safely. Pour the hot water into the roasting pan after it’s positioned on the oven rack. This prevents splashing during transfer and reduces the risk of burns from carrying a heavy pan filled with hot water.
- Check your wrapping. Each layer of foil should completely cover the previous one and extend above the water line. Even small tears or gaps can let water seep in, creating a soggy crust.
- Keep the knife clean. Dip your knife in hot water between each slice and wipe it dry. This simple step helps you achieve clean, professional-looking slices.
- Time the topping. Add and torch the sugar layer just before serving. The crisp topping begins to soften over time due to the cheesecake’s moisture. For the best brûlée top, torch the first layer until it turns amber, let it harden, then add a second layer and torch it. This creates that perfect crack when you break through.
- Follow the cooling steps. The gradual cooling process from oven to room temperature to refrigerator isn’t just about convenience – it’s essential for achieving the right texture and preventing cracks.
- Check for doneness. The cheesecake is ready when the outer 2-3 inches are set, but the center still has a controlled wobble. The center will continue to set as it cools.
- Prevent cracks. Run a knife around the edge of the pan right after baking, but don’t remove the springform ring. This allows the cheesecake to contract as it cools without cracking.
Frequently Asked Questions

More Dessert Recipes to Try
If you enjoy making impressive desserts, try these other favorites:
- Chocolate Pecan Pie Bars – Rich chocolate and pecans nestled on a buttery shortbread crust, perfect for when you want the flavors of pecan pie in an easy-to-serve bar form.
- Cherry Puff Pastry Turnovers – Sweet homemade cherry pie filling wrapped in layers of flaky, golden-brown pastry, finished with a sprinkle of coarse sugar for extra crunch.
- Blueberry Peach Cobbler – Fresh peaches and blueberries bubbling under a golden brown cobbler crust, served warm with a scoop of vanilla ice cream.
Let’s Connect! If you make this recipe or any other recipe on Casual Epicure, please don’t forget to rate the recipe and leave a comment below. It helps others who are considering making our recipes and we love hearing about your cooking experiences. And if you snapped some shots, share them on Instagram, and be sure to tag @casual.epicure so we can feature them in our stories.
Creme Brûlée Cheesecake
Want To Save This Recipe For Later?
Equipment
- Large Bowl
- 9-inch Springform Pan
- Large Roasting Pan
- Stand Mixer, recommend or use a large bowl with a hand mixer
- Fine Mesh Strainer
- Culinary Torch
Ingredients
Graham Cracker Crust
- 1½ cups graham cracker crumbs
- 3 tablespoons sugar
- 6 tablespoons unsalted butter, melted
Cheesecake
- 32 ounces cream cheese, softened
- 1 cup sugar
- ⅔ cup sour cream
- 1 teaspoon vanilla extract
- ¼ teaspoon kosher salt
- 4 large eggs, room temperature
Creme Brûlée
- 3-4 tablespoons superfine sugar, see notes
Instructions
Graham Cracker Crust
- Preheat oven to 325℉.
- Wrap the outside of the springform pan thoroughly with 3 layers of heavy-duty aluminum foil, ensuring the foil comes up the sides of the pan. Be very careful not to tear the foil. Each layer should be a separate piece of foil that completely covers the previous layer.
- Combine graham cracker crumbs and sugar and stir well. Add melted butter and use a fork to combine ingredients well.
- Pour crumbs into a 9” Springform pan and press firmly into the bottom and up the sides of your pan. Set aside.
Cheesecake
- Add cream cheese, sour cream, vanilla extract, sugar, and salt to a stand mixer (or a large bowl if using a hand mixer) and mix until smooth and creamy. Don’t overbeat, or you’ll incorporate too much air. Pause occasionally to scrape the sides and bottom of the bowl with a spatula so that all ingredients are evenly incorporated.
- With the mixer on low speed, gradually add the eggs, one at a time, mixing just until each egg is incorporated. Once all eggs have been added, use a spatula to scrape the bowl’s sides and bottom again and ensure all ingredients are well combined.
- Pour the cheesecake batter into the prepared springform pan. Place the foil-wrapped springform pan into a large roasting pan.
- Place the roasting pan with the cheesecake on the center oven rack. Carefully pour hot water into the roasting pan until it reaches halfway up the sides of the springform pan (about 1 to 1½ inches of water).
- Transfer to the center rack of your oven and bake at 325℉ for approximately 65-75 minutes (see recipe notes). The cheesecake is done when the outer 2-3 inches appear set when the pan is shaken gently and slightly raised, while the center 3-4 inches has a controlled wobble.
- When baking is complete, turn off the oven and crack the oven door open about 1 inch. Leave the cheesecake in the oven for 1 hour (leave it in the water bath during this time).
- After 1 hour, carefully remove the roasting pan from the oven. Remove the springform pan from the water bath, carefully peel off the foil, and place on a cooling rack.
- Run a knife around the edge of the cheesecake to loosen it from the pan, but don't remove the springform. Allow to cool at room temperature for 2 hours, then cover and refrigerate for at least 4 hours or overnight.
Creme Brûlée
- Remove the springform pan ring.
- Gently pat the surface of the cheesecake with a paper towel to remove any condensation.
- Using a fine mesh strainer, evenly dust about 1½ – 2 tablespoons superfine sugar over the entire surface of the cheesecake, ensuring complete but thin coverage.
- Hold your culinary torch at a 45-degree angle, approximately 2-3 inches from the sugar-dusted surface.
- Using slow, sweeping motions, move the torch flame continuously over the sugar in small circles until it melts and turns a light amber color about 2-3 minutes.
- Allow the first layer to harden for 1 minute.
- Sprinkle a second layer of sugar (about 1 tablespoon) evenly over the first caramelized layer.
- Repeat the torching process more gently to create a second caramelized layer.
- Let the topping cool and harden completely for about 2-3 minutes.
- Refrigerate for 15-20 minutes to ensure the cheesecake is well set before serving.
- Dip a sharp knife in hot water for the cleanest cuts, dry completely, and wipe clean between each slice. Top with fresh berries and serve.
- Cover and store leftover cheesecake in the refrigerator for up to 5 days.