Enhance your holiday turkey with a simple yet essential preparation technique. Brining your turkey makes all the difference. This method involves soaking the bird in a solution of broth, salt, sugar, and flavorful herbs and spices which locks in moisture, infuses incredible taste, and results in tender meat. Our simple turkey brine will allow you to say goodbye to dry, flavorless turkey and hello to a mouthwatering centerpiece.
Want To Save This Recipe For Later?
Before you begin brining, ensure you know how to thaw a turkey safely. This brine works great for whole turkeys, or try it with our grilled turkey breast for a smaller meal. Once your brined turkey is roasted and ready to serve, pair it with old-fashioned Thanksgiving dressing and turkey gravy for the complete holiday experience.
Why Brine a Turkey
Wet brining a turkey is an excellent technique for enhancing its taste and moisture. By soaking the turkey in a solution of broth, salt, sugar, and various herbs and spices, the meat absorbs the flavorful liquid. Brining adds moisture to the turkey, making it juicier, more tender, and flavorful when cooked. The salt also helps to season the meat throughout, while the herbs and spices impart a rich, aromatic flavor.
Wet vs Dry Brine – What’s the Difference
The primary difference between wet brining and dry brining lies in the method used to impart flavor, tenderness, and moisture to meat. Both use salt to help break down the protein, meaning less moisture is expelled during cooking.
- Wet Brine:
- Wet brining involves immersing the turkey in a saltwater solution combined with various flavor-enhancing ingredients, such as broth, sugar, herbs, and spices.
- The turkey is submerged in the brine mixture for an extended period, typically 12-24 hours.
- The brine penetrates the meat, imparting moisture, flavor, and seasoning throughout. It also helps break down muscle proteins for added tenderness.
- Wet brining requires a container large enough to hold the turkey and the brine. It’s a more immersive and hands-on process.
- Dry Brine (Also known as Dry Rub or Salt-Only Brine):
- Dry brining involves applying a mixture of salt and optional seasonings directly to the turkey’s surface, often under the skin and on the meat.
- The turkey is left uncovered in the refrigerator for an extended period, typically 24-48 hours, allowing the salt to draw out moisture, which is later reabsorbed along with the seasonings.
- Unlike wet brining, dry brining does not involve immersion in a liquid solution. Therefore, it is less messy and requires less space in the fridge.
- Dry brining still imparts moisture, flavor, and seasoning to the turkey, but in a different way. It doesn’t break down proteins like wet brining, but, due to the moisture removal, it produces crispy skin.
What to Brine Your Turkey In
When brining a turkey, it’s important to use a food-safe container large enough to hold the turkey and the brine. Some common options are a food-grade plastic brining bag, a large stock pot, a brining bucket, or a cooler.
Regardless of the container you choose, ensure it’s made of food-grade materials and is clean and sanitized before adding your turkey and brine. It’s also important to keep the turkey and brine cold (40°F or lower) during the brining process, so make sure whatever you use to brine your turkey will fit in the refrigerator. If you’re bringing in a cooler, make sure you have plenty of ice packs.
Key Ingredients and Variations
A brining solution has two key ingredients besides the turkey: broth and salt. These ingredients form the foundation of a basic turkey brine, but there is much room for creativity and customization.
In the printable recipe below, you can find a complete list of ingredients and measurements.
- Turkey: You don’t need any special kind of turkey to brine, and you can brine a turkey breast.
- Broth: Both vegetable and poultry broth are good options, especially if you have some homemade broth on hand.
- Salt: Kosher salt is the best salt for brining. It dissolves easily, has a pure, clean taste, and does not contain additives like iodine or anti-caking agents that can affect the flavor of the brine.
- Sugar: Besides enhancing the flavor, sugar balances the saltines and promotes browning during roasting. The type of sugar can vary depending on your personal preference: white sugar, brown sugar, maple syrup, or honey.
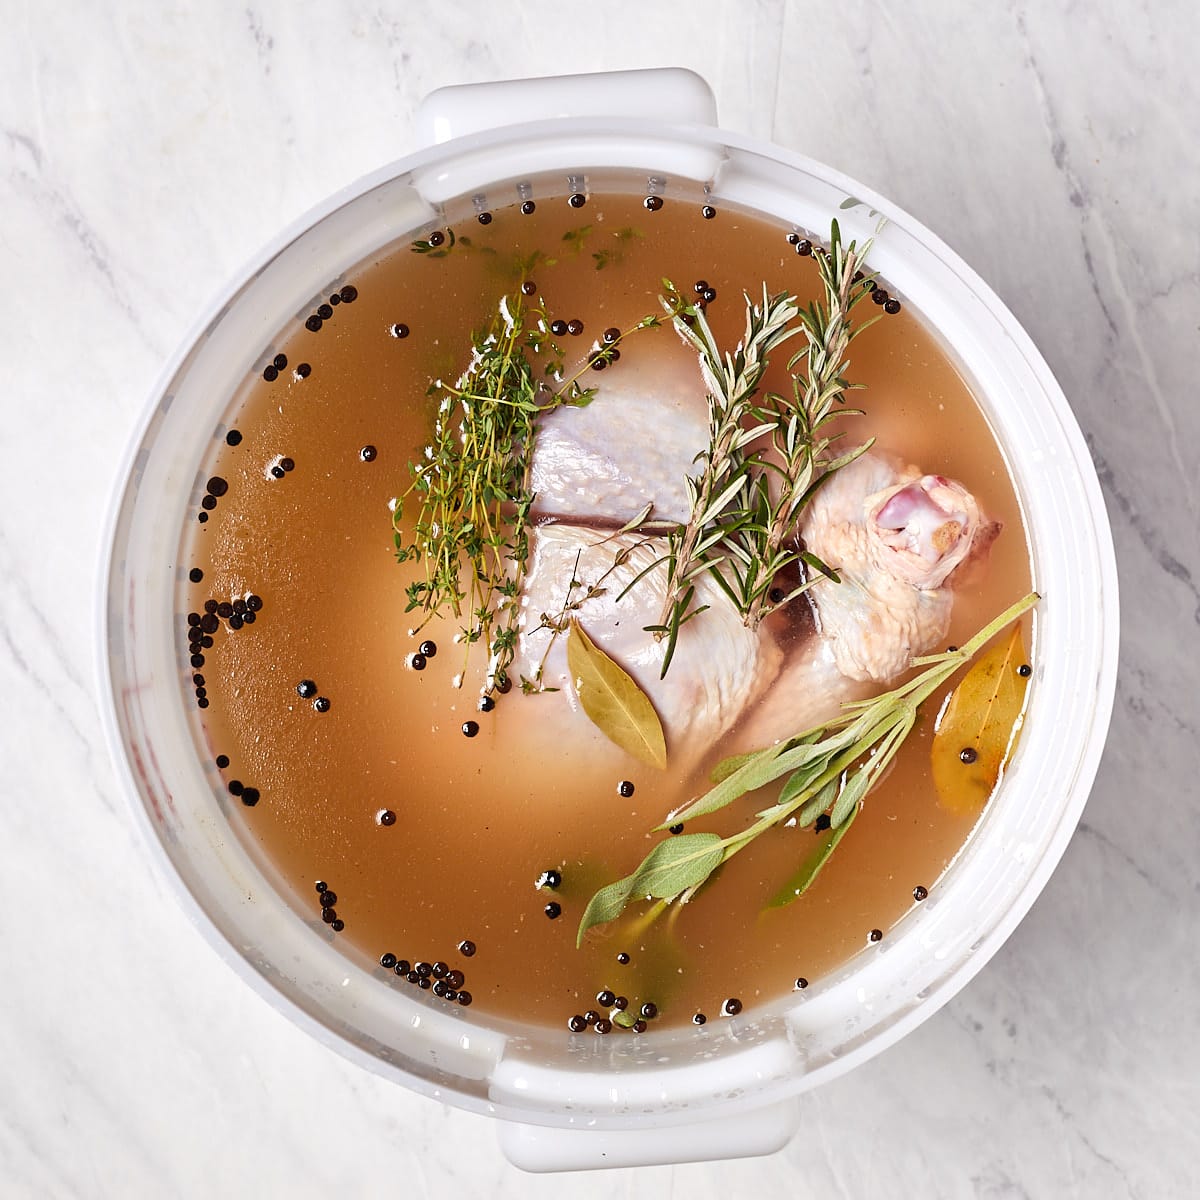
- Aromatics: We used rosemary, thyme, and sage, along with black peppercorns, bay leaves, and allspice.
While we prefer a straightforward brine, feel free to customize it with liquid flavorings like apple cider, white wine, or even a touch of soy sauce. You can easily introduce extra depth with aromatics such as garlic, onions, or zesty citrus slices. These components lay the groundwork for a fundamental turkey brine, leaving ample space for creative adjustments. Feel free to experiment with your favorite herbs, spices, or other flavorings. Just remember to strike the right balance in terms of salt and sugar proportions to avoid overly salty or sweet outcomes.
Salt to Liquid Brining Ratio
For a basic turkey brine, a common ratio is about 1 cup of kosher salt (or 3/4 of table salt) to 1 gallon of liquid (water or broth). This provides a good starting point, but you can adjust the amounts depending on your preferences and the size of your turkey. Keep in mind that it’s important to dissolve the salt in the liquid thoroughly.
How to Brine a Turkey
Here are the quick, step-by-step instructions with visuals; you can find the full instructions, including the exact ingredients, in the recipe card below.
Pro-tip: Brine your turkey in the refrigerator or a well-chilled cooler. The temperature should remain below 40°F to prevent bacterial growth.
1. Dissolve the Sugar and Salt: In a large pot, bring the turkey stock to a boil and then add salt and sugar, stirring until they dissolve. Once the sugar and salt have dissolved, add the bay leaves, peppercorns, and allspice berries. Remove the pot of brine from the heat and allow it to cool to room temperature.
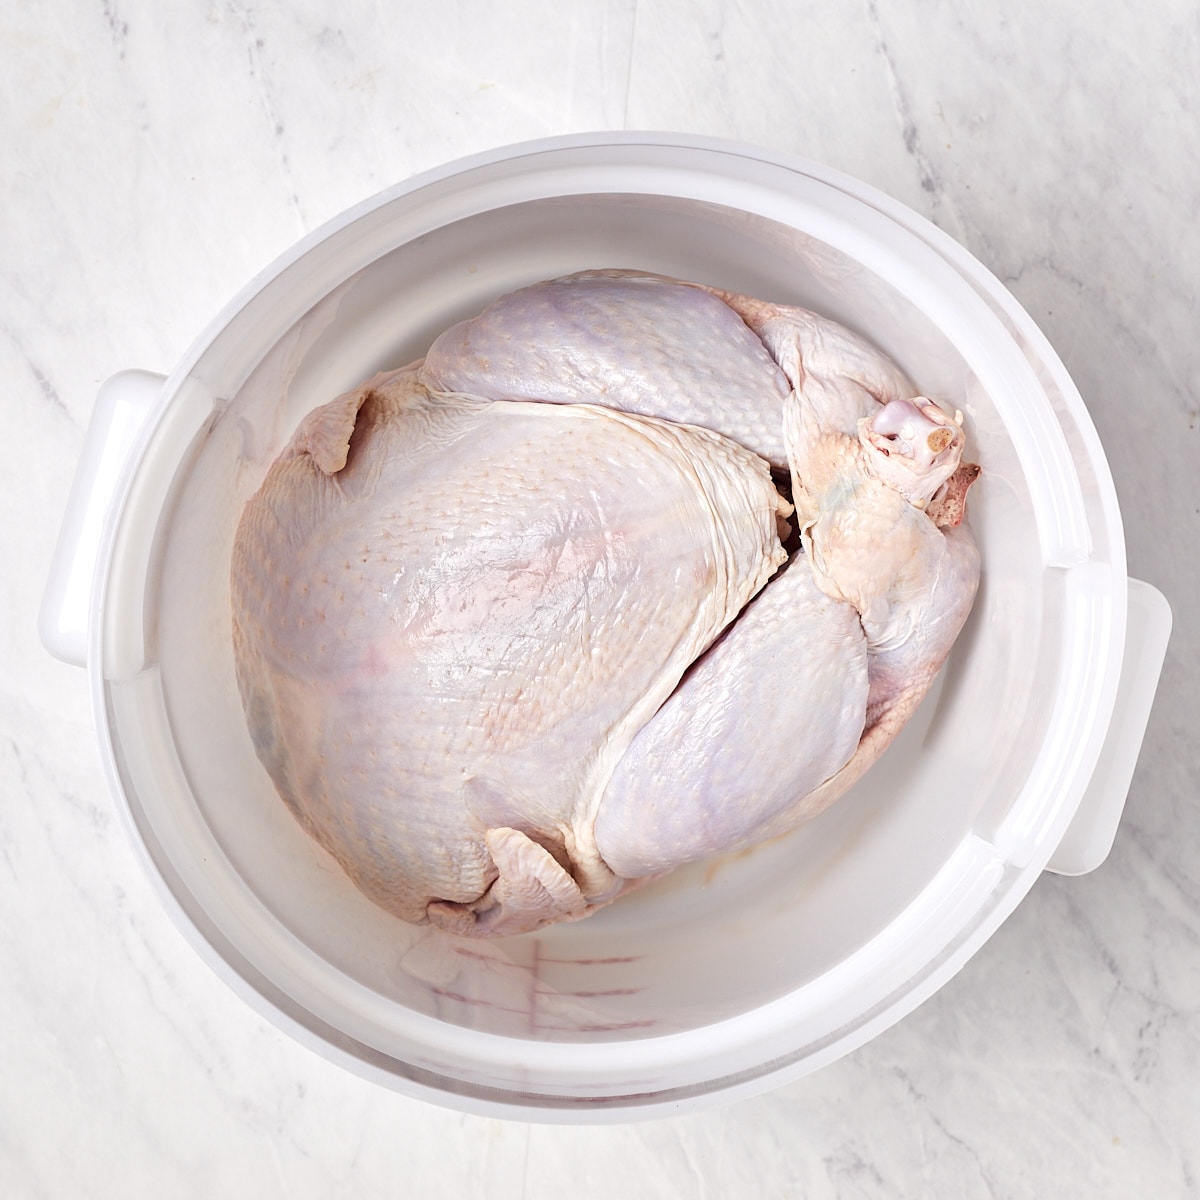
3. Brine the Turkey: The Turkey should be thawed before brining. For detailed thawing instructions, see our How to Thaw a Turkey guide. Remove the giblets and neck from the turkey cavity, then pat it dry with paper towels. Place the turkey into a clean, food-grade plastic container, pot, or brining bag. Make sure it’s large enough to hold the turkey and the brine solution. Pour the cooled brine along with the ice water over the turkey, making sure it’s fully submerged. Add fresh rosemary, thyme, and sage sprigs to the turkey and brine. If the turkey is floating, you can use a heavy plate or a bag of ice to keep it submerged. Seal the bag or cover the container and place it in the refrigerator.
4. Refrigerate: Brine the turkey for approximately 1 hour per pound, but not less than 12 hours and not more than 24 hours. Longer brining can make the turkey too salty. Turn the bird once halfway through brining. If your refrigerator doesn’t have enough space, you can also use a cooler with ice packs to keep it at a safe temperature. After the brining period is complete, remove the turkey from the brine, making sure to safely discard it afterwards as it is no longer usable.
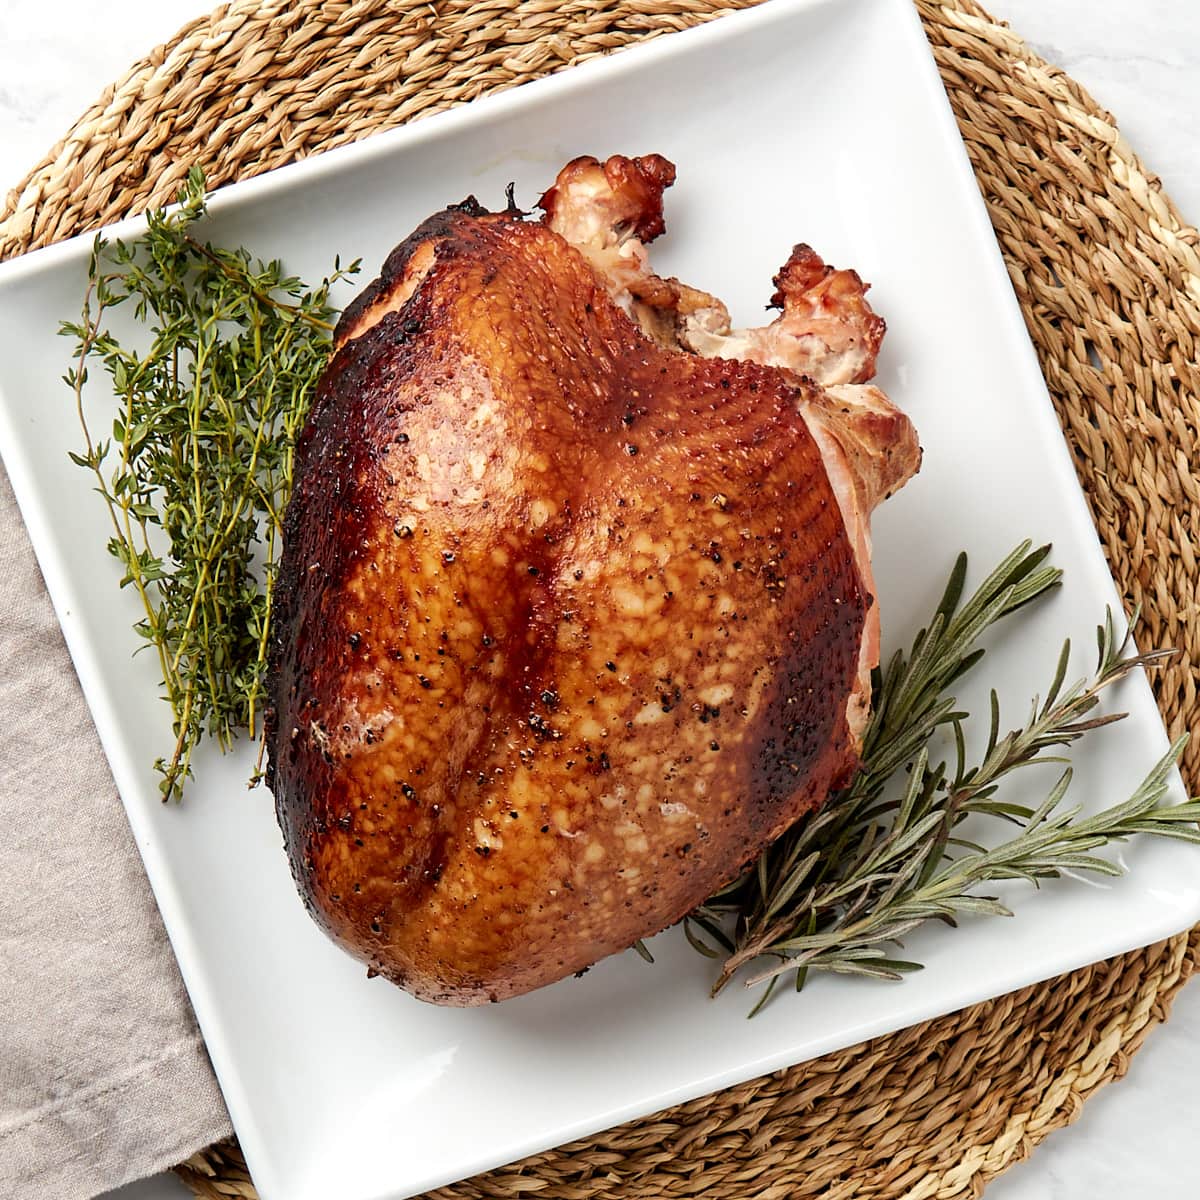
5. Cook the Turkey: Once brined, the turkey is ready to be roasted, smoked, grilled, or prepared according to your favorite recipe.
How to Cook a Brined Turkey
Brining a turkey can add wonderful flavor and moisture to the meat, and there are several ways to cook a brined turkey. We love the traditional roasting method, but we really enjoyed a grilled turkey. Grilling a brined turkey can infuse it with a delicious smoky flavor but they can also be fried, cooked on a rotisserie, or smoked.
Whichever cooking method you choose, ensure the turkey reaches a safe internal temperature of 165°F. Each method imparts its unique flavor and texture, so you can select the one that best suits your preferences and equipment.
Recipe Tips and Notes
- Keep it cold. When bringing turkey, it is important to keep a safe temperature of 40°F or lower to prevent bacterial growth. This temperature range ensures that the turkey remains food-safe and doesn’t enter the “danger zone,” where bacteria can multiply rapidly.
- Plan ahead. The turkey should soak in the brine for about 1 hour per pound, so allow sufficient time for brining.
- Use a food-grade container. Choose a food-safe container, such as a large stockpot, food-grade plastic container, or brining bag, that’s large enough to fully submerge the turkey.
- Rest before cooking. Allow the turkey to air-dry in the refrigerator for a few hours or overnight. This helps to create a crispier skin when roasting.
- Don’t throw out the turkey neck and giblets. Instead, turn them into a rich and delicious turkey gravy.
Frequently Asked Questions
Thanksgiving Recipes To Try
Looking for more Thanksgiving recipes? Try these other favorites:
- Turkey Neck Gravy – Transform your turkey drippings into a rich, flavorful gravy that’s the perfect complement to your brined bird. This classic recipe uses pan drippings and simple seasonings to create a smooth, savory sauce.
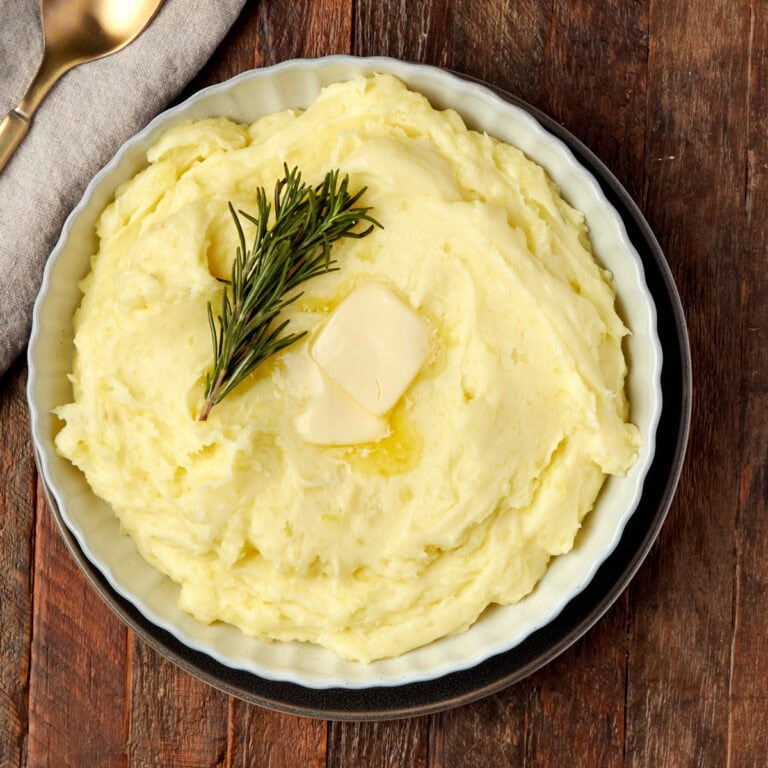
- Rosemary Garlic Mashed Potatoes – Creamy mashed potatoes infused with aromatic rosemary and garlic make the ideal side dish for your holiday turkey. The herbs pair beautifully with the flavors from your brine.
- Grilled Turkey Breast – Take your brined turkey to the grill for a smoky twist. This recipe delivers juicy, tender meat with crispy skin that’s perfect for smaller holiday meals or summer cookouts.
Let’s Connect! If you make this recipe or any other recipe on Casual Epicure, please don’t forget to rate the recipe and leave a comment below. It helps others who are considering making our recipes and we love hearing about your cooking experiences. And if you snapped some shots, share them on Instagram, and be sure to tag @casual.epicure so we can feature them in our stories.
Simple Turkey Brine
Want To Save This Recipe For Later?
Equipment
- Large Saucepan or Dutch Oven
- Brining Bags optional
Ingredients
- 8 cups turkey, chicken or vegetable broth or stock
- 2 bay leaves
- 1 tablespoon black peppercorns
- 1 ½ teaspoon allspice berries
- 1 ½ cups kosher salt
- ½ cup sugar
- 12-14 pound whole turkey, thawed
- 1 gallon ice water, enough to cover turkey
- 1-2 sprigs fresh rosemary
- 1-2 sprigs fresh thyme
- 1-2 springs fresh sage leaves
Instructions
- In a large pot, bring the stock (or broth) to a boil. Add salt and sugar, stirring until they dissolve. Add the bay leaves, peppercorns, and allspice berries.
- Remove the pot from the heat and allow the brine to cool to room temperature.
- Remove the giblets and neck from the turkey cavity. Pat it dry with paper towels.
- Place the turkey into a clean, food-grade plastic container, pot, or brining bag. Make sure it's large enough to hold the turkey and the brine solution.
- Pour the cooled brine along with the ice water over the turkey, making sure it's fully submerged. If the turkey is floating, you can use a heavy plate or a bag of ice to keep it submerged.
- Add fresh rosemary, thyme, and sage sprigs to the turkey and brine.
- Seal the bag or cover the container and place it in the refrigerator.
- Brine the turkey for approximately 1 hour per pound, but not less than 12 hours and not more than 24 hours. Longer brining can make the turkey too salty. Turn the bird once halfway through brining. You can also use a cooler with ice packs to keep it at a safe temperature if your refrigerator doesn't have enough room.
- After the brining period is complete, remove the turkey from the brine. Discard the brine. Note: there is no need to wash the turkey before cooking.
- The turkey is ready to be roasted, smoked, grilled, or prepared according to your favorite recipe.