Making vegetable broth from kitchen scraps is one of my favorite ways to reduce food waste while creating a flavorful base for cooking. This homemade low-sodium vegetable broth uses bits and pieces usually discarded, along with parmesan rinds that add incredible depth and umami. It’s perfect for making homemade soups like our Italian sausage gnocchi soup or potato leek soup.

Want To Save This Recipe For Later?
The best part about this recipe is its flexibility and economy. You simply collect vegetable trimmings in a freezer bag until you have enough to make a batch. Not only does this approach save money, but it also gives you complete control over the sodium content, something you won’t find in most store-bought broths.
Key Ingredients and Substitutions
What makes this vegetable broth so great is its simplicity and flexibility. Here’s what you’ll need:
In the printable recipe below, you can find a complete list of ingredients and measurements.

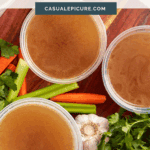
- Vegetable Scraps: This is the foundation of your broth. All those bits and pieces you’d normally throw away. We collect them in a gallon-sized freezer bag until it’s full (about 3.5 pounds of scraps). The best scraps include onion ends and skins, carrot peels and tops, celery ends and leaves, garlic skins, mushroom stems, and herb stems like parsley, thyme, and rosemary. Leek tops and bell pepper cores also add great flavor.
- Parmesan Rinds: These may seem unusual, but Parmesan rinds add incredible depth and umami flavor to the broth. Save the hard ends of your parmesan wedges in the freezer, and toss 2-3 into each batch of broth.
- Salt: We add this at the very end to taste. This gives you complete control over the sodium content, making this broth ideal for low-sodium diets or recipes where you’ll reduce the liquid further.
How to Make Low Sodium Vegetable Broth
Here are the quick, step-by-step instructions with visuals; you can find the full instructions, including the exact ingredients, in the recipe card below.
Pro-tip: Label your freezer bags with the date you started collecting scraps. This helps you rotate your stock and ensures you’re using the freshest ingredients possible for your broth.
1. Fill the Pot: Add your frozen vegetable scraps to a large stockpot along with 2-3 Parmesan rinds. Cover everything with cold water, leaving about 1 inch above the scraps.

2. Boil and Simmer: Place the pot over high heat and bring the water to a rolling boil. This should take approximately 15-20 minutes, depending on the quantity and temperature of your scraps. Once boiling, reduce the heat to low and allow the mixture to simmer gently. Cover partially with a lid and let it cook for 45-60 minutes. The longer it simmers, the more concentrated the flavor will be.

3. Strain: After simmering, remove the pot from heat and strain the liquid through a fine-mesh strainer or cheesecloth into another large container or pot. Press gently on the solids to extract as much liquid as possible, then discard the spent scraps.

4. Season: Now is the time to taste your broth and add salt as needed. Start with a small amount; you can always add more, but you can’t take it away.
Make-Ahead and Storage
Make-Ahead: Vegetable broth is perfect for making ahead. When you have enough scraps, you can prepare a large batch and store it for future use.
How to Store: Allow the broth to cool completely before transferring it to storage containers. It will keep in the refrigerator for up to 1 week in airtight containers. For longer storage, freeze the broth in ice cube trays, then transfer the frozen cubes to freezer bags. This makes it easy to use small amounts as needed. Alternatively, freeze larger portions in freezer-safe containers or bags for up to 3 months.

How to Reheat: If refrigerated, pour the amount needed into a pot and warm over medium heat. If frozen, either thaw overnight in the refrigerator or directly from frozen, depending on your recipe needs.
Recipe Tips and Notes
- Save only clean scraps. Always wash your vegetables before peeling or trimming, and only save clean, fresh scraps for your broth.
- Mind the balance of flavors. Too much of one vegetable can overpower your broth. Aim for a variety of scraps for the best flavor profile.
- Avoid certain vegetables. Cruciferous vegetables like broccoli, cabbage, and Brussels sprouts can make your broth bitter and sulfurous, so use these sparingly if at all.
- Skip the potato peels. They can make your broth cloudy, though they won’t significantly affect the flavor.
- Skim as needed. Some vegetables produce foam as they cook. Skim this off with a spoon for a clearer broth.
- Don’t salt until the end. This gives you complete control over sodium and prevents over-salting if the broth reduces during cooking.
Frequently Asked Questions

More Recipes to Try
Looking for ways to use your homemade vegetable broth? Try these recipes:
- Italian Sausage Gnocchi Soup – This hearty soup combines Italian sausage, gnocchi, and vegetables in a flavorful tomato broth.
- Potato Leek Soup – Your homemade vegetable broth will make this classic soup even more flavorful and delicious.
- Creamy Mushroom Pasta – Use your homemade broth to add depth to this rich, satisfying pasta dish.
- Southern Green Bean Casserole – Elevate this classic side dish by replacing store-bought broth with your homemade version.
Let’s Connect! If you make this recipe or any other recipe on Casual Epicure, please don’t forget to rate the recipe and leave a comment below. It helps others who are considering making our recipes and we love hearing about your cooking experiences. And if you snapped some shots, share them on Instagram, and be sure to tag @casual.epicure so we can feature them in our stories.
How to Make Low Sodium Vegetable Broth with Scraps
Want To Save This Recipe For Later?
Equipment
- Large Saucepan (4 Quarts)
Ingredients
- 1 gallon freezer bag of vegetable scraps, roughly 3.5 lbs
- 2-3 parmesan rinds
- water, enough to cover scraps by 1 inch
- salt to taste
Instructions
- Place the frozen vegetable scraps and parmesan rinds in a large stockpot.
- Cover with cold water, filling to about 1 inch above the level of the scraps.
- Bring to a boil over high heat.
- Reduce heat to low and simmer gently for 45-60 minutes.
- Remove from heat and strain the liquid through a fine-mesh strainer or cheesecloth into another container.
- Season with salt to taste.
- Allow to cool completely before storing.